
Digdag / TreasureData Workflowのエラー処理
概要
この記事はDigdag v0.9.41時点の検証結果に基づく。
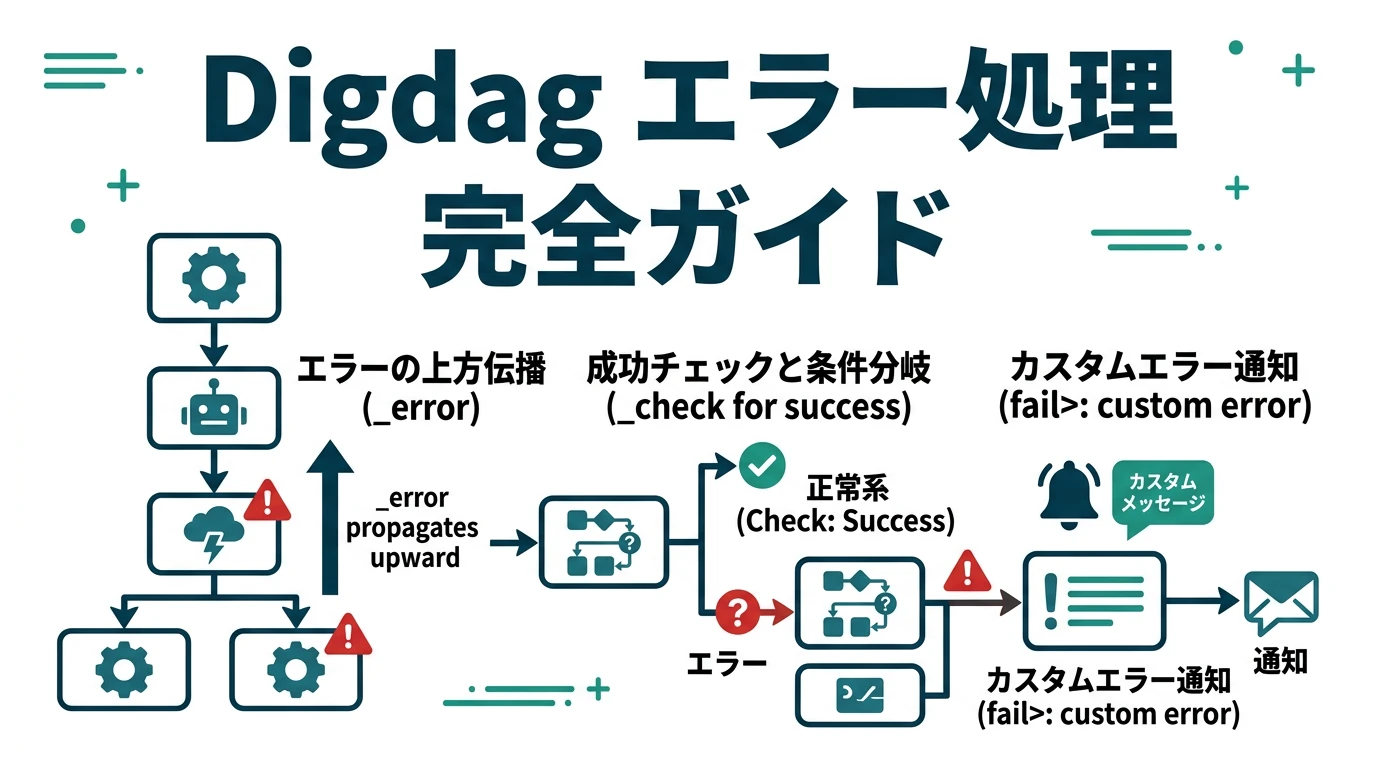
Digdag / TreasureData Workflowのエラー処理。エラー時の処理を指定する_errorだけでなく_checkやfail>:などの処理もあり、エラー発生/成功時の処理をカスタマイズできる。自由度が高く、ワークフローの階層構造とともにうまく使えばワークフローのコードが簡潔になる。公式ドキュメントの説明が不十分なので補足する。
Digdagがエラーと判定して_errorを発動する条件
コマンドの戻り値が0であれば正常、0でなければエラーとみなす。つまりシェルスクリプト(sh:>)の場合は
exit 1
であればエラーとなる。
_errorを複数の階層で記述するとどうなるか
_errorは同一階層には複数記述できないが、異なる階層には記述できる。以下のようにワークフローを設定する。
test.dig
+task1:
  +task2:
    sh>: exit 1
    _error:
      echo>: Task 2 failed.
  _error:
    echo>: Task 1 failed.
_error:
  echo>: Top failed.
- 最上位階層に
Top failed.を表示する_error - 第2階層(
task1の階層)にTask 1 failed.を表示する_error - 第3階層(
task2の階層)にTask 2 failed.を表示する_error
があり、第3階層でエラーを発生させる。
ubuntu@c0591acea4ab:~/digdag/wf_cdp$ digdag run -a -L test.log test.dig
2020-09-13 23:17:39 +0900: Digdag v0.9.41
Task 2 failed.
Task 1 failed.
Top failed.
error:
  * +test+task1+task2:
    Command failed with code 1 (runtime)

Task state is saved at /home/ubuntu/digdag/wf_cdp/.digdag/status/20200912T000000+0000 directory.
  * Use --session <daily | hourly | "yyyy-MM-dd[ HH:mm:ss]"> to not reuse the last session time.
  * Use --rerun, --start +NAME, or --goal +NAME argument to rerun skipped tasks.
第3階層→第2階層→最上位階層と順に動作する。エラー処理を記述した階層だけでなく、上位階層に伝播する。エラーはまとめてSlackに通知したいが細かい処理はワークフローによって分けたい場合などはこの挙動を踏まえておくといい。
エラー処理タスク_errorと成功確認タスク_check
Digdagの_checkはタスクの成功確認をする処理、つまり成功時に実行される処理として_errorと対照的なものとして位置づけられている。しかし詳細ドキュメントがなく、_errorと大きく異なる挙動をするので気をつけておく必要がある。
test1.dig
+task1:
  sh>: ...
_error:
  echo>: Top failed.
_check:
  echo>: Top succeeded.
ケース1.1: task1のshellが成功の場合
ubuntu@c0591acea4ab:~/digdag/wf_cdp$ digdag run -a test1.dig -L test1.log
2020-09-12 22:12:09 +0900: Digdag v0.9.41
Success. Task state is saved at /home/ubuntu/digdag/wf_cdp/.digdag/status/20200912T000000+0000 directory.
  * Use --session <daily | hourly | "yyyy-MM-dd[ HH:mm:ss]"> to not reuse the last session time.
  * Use --rerun, --start +NAME, or --goal +NAME argument to rerun skipped tasks.
何もない ケース1.2: task1のshellの結果がエラーの場合
ubuntu@c0591acea4ab:~/digdag/wf_cdp$ digdag run -a test1.dig -L test1.log
2020-09-12 22:13:04 +0900: Digdag v0.9.41
Top failed.
error:
  * +test+task1:
    Command failed with code 1 (runtime)

Task state is saved at /home/ubuntu/digdag/wf_cdp/.digdag/status/20200912T000000+0000 directory.
  * Use --session <daily | hourly | "yyyy-MM-dd[ HH:mm:ss]"> to not reuse the last session time.
  * Use --rerun, --start +NAME, or --goal +NAME argument to rerun skipped tasks.
_errorの処理が実行される
test2.dig
+task1:
  sh>: ...
  _error:
    echo>: Task 1 failed.
  _check:
    echo>: Task 1 succeeded.
_error:
  echo>: Top failed.
_check:
  echo>: Top succeeded.
ケース2.1: task1のshellが成功の場合(exit 0)
ubuntu@c0591acea4ab:~/digdag/wf_cdp$ digdag run -a test2.dig -L test2.log
2020-09-12 22:15:31 +0900: Digdag v0.9.41
Task 1 succeeded.
Success. Task state is saved at /home/ubuntu/digdag/wf_cdp/.digdag/status/20200912T000000+0000 directory.
  * Use --session <daily | hourly | "yyyy-MM-dd[ HH:mm:ss]"> to not reuse the last session time.
  * Use --rerun, --start +NAME, or --goal +NAME argument to rerun skipped tasks.
task1内の_checkの処理のみが実行される
ケース2.2: task1のshellの結果が失敗の場合(exit 1)
ubuntu@c0591acea4ab:~/digdag/wf_cdp$ digdag run -a test2.dig -L test2.log
2020-09-12 22:15:54 +0900: Digdag v0.9.41
Task 1 failed.
Top failed.
error:
  * +test1+task1:
    Command failed with code 1 (runtime)

Task state is saved at /home/ubuntu/digdag/wf_cdp/.digdag/status/20200912T000000+0000 directory.
  * Use --session <daily | hourly | "yyyy-MM-dd[ HH:mm:ss]"> to not reuse the last session time.
  * Use --rerun, --start +NAME, or --goal +NAME argument to rerun skipped tasks.
task1内の_errorの処理→上位階層の_errorの処理の順に実行される
_checkは_checkが設定されたタスク自体が成功した(エラーにならなかった)場合に発動する。子階層のタスクが成功しても発動しないため、全体の成功確認には使えない(ケース1.1)
_errorは_errorが設定されたタスクでもその子階層のタスクのエラーでも発動する(上位階層に伝播する)。
エラーメッセージの扱い
test3.dig
+task1:
  sh>: exit 1
  _error:
    echo>: Task 1 failed. ${error.message}
  _check:
    echo>: Task 1 succeeded.
_error:
  echo>: Top failed. ${error.message}
実行結果
ubuntu@c0591acea4ab:~/digdag/wf_cdp$ digdag run -a test3.dig -L test3.log
2020-09-12 22:43:35 +0900: Digdag v0.9.41
Task 1 failed. Command failed with code 1 (runtime)
Top failed. Command failed with code 1 (runtime)
親階層の_errorでも子階層の_errorでもbash実行時のエラーであるCommand failed with code 1 (runtime)が表示される。なおsh>:で実行したスクリプトのエラー出力(標準出力も)はdigdagでは捕捉できない。
fail>:オペレータ
fail>:はエラーを発生させるオペレータ。Pythonのraiseや他の言語のthrowなどと同じ役割。
+task1:
  fail>: Failure generated!
  _error:
    echo>: Task 1 failed. ${error.message}
_error:
  echo>: Top failed. ${error.message}
のようにすると指定のタスク失敗時にエラーメッセージをカスタマイズ(ここではFailure generated!を挿入)できる。
ubuntu@c0591acea4ab:~/digdag/wf_cdp$ digdag run -a test4.dig -L test4.log
2020-09-12 22:47:50 +0900: Digdag v0.9.41
Task 1 failed. Failure generated!
Top failed. Failure generated!
fail>:の後に記入した文字列が${error.message}として格納され、親階層の_error内で参照される。
なおfail>:は他のオペレータ(sh>:やecho>:など)と並列にできないので、
+task1:
  +task2:
    sh>: exit 1
  _error:
    +myerror1:
      echo>: Task 2 ERROR!
    +myerror2:
      fail>: Failure generated! ${error.message}
_error:
  echo>: Top failed. ${error.message}
のように階層を下げて新たにタスクを設定するとエラー送出の前に指定の処理を実行できる。
ubuntu@c0591acea4ab:~/digdag/wf_cdp$ digdag run -a test4.dig -L test4.log
2020-09-12 23:07:23 +0900: Digdag v0.9.41
Task 2 ERROR!
Top failed. Failure generated! Command failed with code 1 (runtime)
myerror1でechoしたTask 2 ERROR!と全体の_errorでechoしたTop failed. ...が両方表示されている。